19.11.2013 | Frederik Ramm
The other day we were asked to quickly throw together an “offline map” for laptop use by crisis responders in the Philippines. We had a couple of hours to create something that was simple and rugged, something that ideally runs on any operating system without having to install software.
We knew that you can easily use OpenLayers or Leaflet plus a directory of pre-produced tile PNG images and then access that with a “file://” type URL from your local browser. This solution can even be run from an USB stick without any software installation, and any halfway recent browser works – be it OSX, Windows, Linux, or even more exotic operating systems. There are many more sophisticated solutions – storing vector data on the device gives you more interactivity and detail at a fraction of the disk space, or if using raster tiles, storing them in MBTiles format is less clumsy because it’s just a single file. All these options require some software installation though. So we decided to go with the old-style technology – but we made one minor tweak that made our solution much more useful on certain systems.

Because our set of tiles might be used on computers that use FAT file systems – crucially, most USB sticks or external USB drives will come formatted with that -, we had to take into account that FAT allocates space in full clusters. Even a small 500-byte PNG will consume one full cluster; and the cluster size on FAT systems can go up to 32 kB. With many high-zoom tiles being near empty, this means we’re wasting a lot of space.
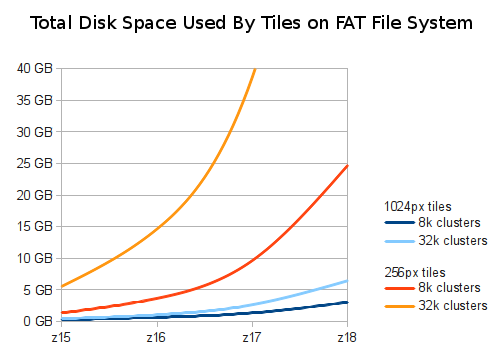
The area we were exporting was about 2 GB of image data. The red and orange lines in the above image show how much disk space this would have used had we stored single 256×256 pixel tiles (the standard size) on a FAT system with 8 kB or 32 kB cluster size. Zoom level 18 tiles for the area in question would have taken 25 GB on a volume with an 8kB cluster size, and almost 100 GB (shooting out of the graph) with a 32kB cluster size.
Instead, we opted for making non-standard tiles with 1024×1024 pixels, 16 times as big as standard tiles. This puts more of the map in every single image, and reduces the waste incurred by “rounding up” to the nearest cluster size dramatically. OpenLayers accepts a “tileSize” parameter and processes the non-standard tiles flawlessly.
Unpacking our tiles down to z18 now only takes 6 GB on a volume with a 32 kB cluster size, and 3 GB if the cluster size is 8 kB – perfect for a “map-on-a-stick”!
If you find yourself in a similar situation – there are probably many ways to generate tiles like these, but we used Tirex which we configured to use large tiles (config option tilesize=1024), and then converted the resulting meta tiles to simple PNGs with the meta2tile utility. Remember that when doing this, you’ll only compute tiles down to a nominal zoom level of 16 which, because each tile has 1024×1024 pixels, gives you the same amount of detail that you’d normally see at zoom level 18. Then, in OpenLayers, you’ll have something like var map = new OpenLayers.Map('map', { tileSize: new OpenLayers.Size(1024, 1024) }) to work with these tiles.
(Hat tip to Matt Amos and Ian Dees on whose ideas we based this.)